DIY Closet Shelves and Rods: 5 Easy Steps for this Quick Weekend Project
Updated April 19, 2024
If you’re wondering how to DIY closet shelves and rods for your walk-in closet or front hall closet, you’ve come to the right place!
In this post, I’m sharing all the details on how we installed a wood shelf and rod in our front entry closet, along with where to buy materials, how much everything cost, and how long it took.

This post may contain affiliate links, which means we’ll receive a commission if you purchase through our link, at no extra cost to you. You can read our full disclosure here.
This do-it-yourself project is a beginner-friendly, affordable, and quick weekend project to tackle. You can easily replicate these closet shelving ideas for a walk-in closet too!
For more closet ideas, check out our post on the Ikea PAX Closet for a customized walk-in closet system solution!
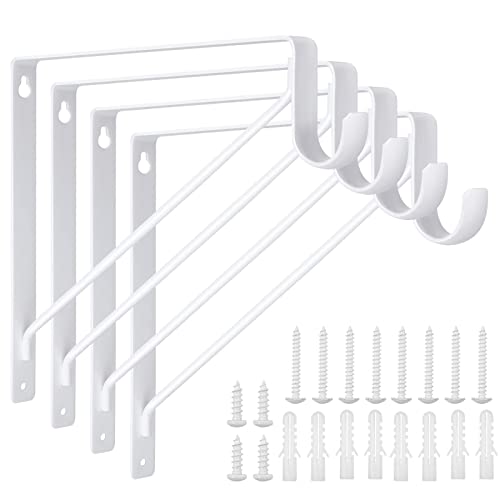
Amazon Closet Shelf and Rod Brackets
We bought these exact brackets to support our wood shelf and it fits closet rods up to 1-5/16″.
Price not available

How to DIY Closet Shelves and Rods:
Here are 5 easy steps and helpful tips for DIY closet shelving and rod installation. Continue reading to the end for our total cost and how long it took!
1) Assess Your Closet Needs and Measure

Closet Needs: This closet project was for our front hall closet that didn’t have any closet system installed and we were looking for one single shelf with a durable closet rod to hang guest jackets.
Closet Dimensions:
- 64” width
- 23.5” depth
- 10 ft ceilings

2) Buy Project Materials
What You’ll Need to DIY Closet Shelves:
I go into greater detail about these and the exact ones we used and why!
All-in-One System
If you’re looking for an easy all-in-one system, you can consider this affordable Amazon ClosetMaid Shelf Kit. It has over 2,000 ratings on Amazon and comes with a shelf, rod, and brackets.
For us, we didn’t prefer the wire shelf look and wanted a solid wood shelf supported by brackets and a single rod, so we had to find all the materials separately.

Brackets
The exact brackets we bought were this Amazon Heavy Duty Closet Shelf & Rod Bracket that comes in a pack of 4.
We used all 4 of these to support a wood shelf and it fits closet rods up to 1-5/16 inches.
Amazon Closet Shelf and Rod Bracket
Price not available
Closet Rod
Our closet width is 64” so we needed an extra long rod to cut to size. We chose this low-cost 72-inch Home Depot Heavy-Duty Steel Closet Rod, ordered online, and picked it up from the store.
What we liked about this rod in particular is that it is NOT extendable and we didn’t want an overlap with the little bump in the middle that typically comes with an extendable rod (just personal preference)!
An alternative heavy-duty closet rod option we considered was this Amazon Heavy Duty Adjustable Closet Rod that has 700+ reviews and comes in various sizes up to 84” in length.
We bought this initially and it felt very strong and sturdy, and only ended up returning it since we found the white rod from Home Depot that was much cheaper.
If you want your rod to be extendable, there are really affordable options like this Amazon Adjustable White Closet Rod with 5,000+ reviews.
Closet Rod End Supports
Typically, you’d use closet rod end supports to hold the rod in place and complete the installation of your closet rod.
We did buy closet pole sockets BUT ended up not using them since the bracket held the rod in place just fine and this front hall closet was not going to be heavily used daily (in other words, we got lazy at the end).
Wood Shelf

We source all our wood from a local lumber store called Owl Hardwood Lumber Company (if you’re in the Chicago area) and always have a great experience there.
The helpful associate told us that poplar is a cost-effective and popular wood type if you will be painting it. He helped us find a board closest in size to what we needed and cut it to size for us.
Our wood shelf dimensions ended up being 64” L x 12” D x 1” H.
Alternatively, you can always check out Home Depot for poplar wood and see if they will cut it to size for you.
3) Prep and Paint Wood Shelf
To prep the wood shelf for painting, we sanded it with 320-grit sandpaper with an orbital sander for a smooth finish. You can always sand by hand as well.
After sanding, we primed the wood with a primer paint – any brand will be fine and we just used what we had at home already.

After priming, we painted two coats of Sherwin Williams Emerald Urethane Trim Enamel Satin Finish in Pure White (SW 7005) to match our walls that are Pure White.
We chose this paint since we’re a fan of the Emerald line and it supposedly creates a hard durable finish that withstands wear and tear of frequently cleaned and used areas, according to their website and the showroom associate!
When painting, we always use the Purdy brand and have great results every time. We used this Purdy mini roller and Purdy 4 1/2″ White Dove rollers.
4) Install Brackets for Shelf and Rod
Figure out how high to mount brackets:
- We have 10 ft ceilings so we mounted the shelf and rod higher than normal so it would look proportionate to the rest of the space.
- The top of the shelf ended up being 71.5” from the ground.
- The bottom of the closet rod was approximately 67” from the ground.

Locate studs and plan where to put each bracket:
- In our case, the studs were not in the exact spots that would make the mounts symmetrical, but we figured we’d rather have the shelf and rod have better support.
- We were able to have 3 brackets attached to the studs and one mounted using drywall anchors.
- For all of our projects, we use a Stud Buddy along with an electronic stud finder to locate studs.

Helpful Tip: Use a laser level to ensure all brackets are at the same height!

Once the bracket locations are set, mark all mounting holes on the wall:
- A smaller torpedo level helps ensure the mount is vertically straight.

Drill holes and mount brackets:
- We used a long extension bit and right-angle attachment on our driver to reach the screw heads.

Mount shelf:
- We placed the shelf on newly mounted brackets and marked holes for where the brackets would mount to the shelf.
- We removed the shelf and drilled pilot holes. We put painter’s tape on the drill bit at the correct depth to ensure we didn’t drill too deep.
- Lastly, we reinstalled the shelf and screwed in the mounting hardware.


5) Cut Rod to Size and Install
The last step is cutting the rod to size. We re-measured the width of the closet at the exact spot where the rod will go as there is usually imperfection in drywall.
Once we had the required rod length, we put painter’s tape around the rod and marked where to make the cut.
We used an angle grinder with a cutting wheel to make the cut and clean the sharp edge.

The final step was to put the rod in place on the bracket.
We ended up not using the rod end supports we bought since we honestly got lazy at the end and thought that the rod was pretty secure on the brackets as is.

After: DIY Closet Shelves Reveal!
Here’s how our front entry DIY closet shelf and rod turned out!

We love the simple and clean all-white look and are happy with how all the pieces came together despite being from different brands.

For finishing touches, we used wood hangers and leather baskets to introduce some warmth and create an inviting feel for this front hall closet.

Our primary purpose for this closet is for coat storage for guests while we host, so we were very happy with this outcome with minimal effort on our part!
How Much Did it Cost?
DIY Closet Shelf Cost: $123
- Brackets – $25
- Closet Rod – $23
- Rod End Supports – $5
- Wood Shelf – $30
- SW Paint (on sale) – $30
- Primer – $10
- (We already had all other materials/tools)

How Long Did This Project Take?
- Day 1:
- Sourcing wood and had the lumber store cut it to size for us – 1 hr
- Sand and Prime wood – 15 min (not including dry time)
- Paint wood – 30 min (not including dry time)
- Day 2:
- Install the brackets, shelf, and rods – 1 hr

Conclusion: DIY Closet Shelves and Rod
This DIY closet shelf project was probably the easiest DIY project we’ve ever done. We planned our shelf and rod project in the simplest way possible without spending a ton of money or time.
I hope this post was helpful for you and inspired you to tackle your closet shelves with confidence!
For more closet ideas, check out our post on the Ikea PAX Closet for a customized walk-in closet system solution.
Follow us on Instagram @vivandtim.home for more home inspiration!
PIN FOR LATER:


Leave a Comment