DIY Ikea Hacks: How to Make DIY Drawer Fronts (You’ll Never Know It’s the PAX!)
Updated April 2, 2025
In this post, we’re sharing easy Ikea hacks on how to make custom DIY drawer fronts for a walk-in closet.
From measuring and choosing materials to painting and installing, we’ll break down the process step by step.

When building our built-in DIY closet with PAX wardrobes, we figured out how to plan out custom drawer faces and install them to create a perfect fit!
The IKEA PAX closet system is a great starting point for organizing your space, but it can often feel a little too basic right out of the box.
Adding DIY custom drawer fronts is an easy way to upgrade the look and make the PAX system look completely built-in!
This is how our DIY walk-in closet turned out after installing our painted drawer faces:

How to Calculate Dimensions of Drawer Fronts
For the 29” wide PAX frame units, to have 1/8” spacing on the sides, these were the exact dimensions of our drawer fronts:
- Height: 7 3/4”
- Width: 27 3/4”
- Thickness: 3/4” (23/32”)
To figure out the dimensions, we used Sketchup (see screenshot below).

If you’d like to cut these yourselves you can use 1×10 primed boards (this would’ve cost us $160 for material) as an alternative and cut it to size yourself with a table saw.
Alternatively, if you’re okay with larger gaps in between and don’t want to have to rip the boards, buying 1×8 primed boards is another option.
Just know that you may need to change the shelf height above the top drawer to accommodate.
Choosing the Right Wood Type for Drawer Fronts
When it came to picking the right wood for our custom IKEA PAX drawer fronts, we went with Poplar—and it turned out to be a great choice.
It’s reasonably priced, easy to work with, and paints beautifully, which made it the perfect choice.
Another option we considered was buying 1×10 boards from a hardware store and cutting them down ourselves.
While that could have worked, it would have taken much more time and effort.

Instead, we decided to save ourselves the hassle and had our local lumber yard cut the poplar boards to our exact dimensions.
(We recommend Owl Lumber in Lombard, IL if you’re in the Chicago area.)
This way, we could jump straight to painting and assembly without worrying about making precise cuts at home.
For all 16 drawer fronts, the total cost, including the cutting service, came to $228.10.
Honestly, it was worth every penny to save time and get perfectly measured pieces!
After picking up the cut drawer fronts from the lumber yard, we checked the measurements and tested one of the pieces in the closet.

Check out our full detailed blog post with a step-by-step tutorial on how to DIY a Custom Ikea Built-in Closet!
Painting the Drawer Fronts
Sanding

The boards from the lumber yard came sanded, but the corners and edges needed to be cleaned up.
We lightly hand-sanded them down with 320-grit sandpaper. This step is key to smoothing out any rough corners.
Priming

Next, we primed the drawer fronts using a foam roller. Rolling the primer on was quick and easy, and it gave us a nice, even base coat to work with.
We ended up doing 3 coats of primer on the front of the faces and 2 coats on all the other sides.
We also sanded in between each coat to ensure a smooth finish.

The layers of primer helped the paint adhere better and prevented any natural wood grain or imperfections from showing through the final coat.
Painting

Once the primer dried, it was time to paint! We used a paint sprayer to apply the color, which gave the drawer fronts a super smooth, professional-looking finish.
Spraying paint also saved a ton of time compared to using a brush or roller, especially with a larger number of drawer fronts to cover

With the sanding, priming, and painting all done, the drawer fronts were ready for hardware and installation.
The extra effort in the painting process made a huge difference, giving the drawers a flawless look that feels completely custom.
Installing Drawer Fronts and Hardware
Drilling Knob Holes in Drawer Fronts
The drawer knob placement we decided on was 6 inches from the sides.

The drill bit size we used to pre-drill knob holes was an 11/64” drill bit.
We did not drill the holes BEFORE painting which we realized was a mistake.
This would’ve made it easier to drill the holes on the drawer fronts without worrying about chipping or damaging the painted drawer fronts.

We used one of the drawer fronts with the measurements for the knob placement as a template to drill the rest, which made the process go a lot quicker.

We were super careful while drilling the knob holes and managed to avoid any damage or chips to the painted drawer fronts, so it ended up working out.

We used painter’s tape on the template piece to prevent the boards from hitting each other.
HELPFUL TIP: You can drill these holes on top of a box to catch all of the mess for an easy cleanup!
Placement of Custom Drawer Fronts

Trial and Error with Playing Cards
We used playing cards as spacers to get the exact placement of the drawer fronts.
This step takes a bit of trial and error and playing cards allows for fine-grain flexibility in figuring out the drawer front spacing.

You’ll want to test-fit the drawer fronts before mounting anything permanently. Here’s how we did this:
We had planned the drawer fronts to have around a 1/8” gap between drawers and estimated 10 playing cards would measure that.

But when we tried it with 10 playing cards from the bottom up, we ended up with too much gap at the very top.
On our second attempt, we adjusted to 11 playing cards each, which lined the drawers up vertically and spaced evenly apart.
Mounting Drawer Faces onto Ikea PAX Drawers
Once the drawer face location was set with the playing cards, we drilled a hole through the hardware drawer face hole into the PAX drawer using the same 11/64″ drill bit.

We then drove in wood screws into the holes which held the drawer front to the PAX drawer box.
The drawer can then be opened with the drawer front temporarily attached.

Then 4 pilot holes were made with a 5/64″ drill bit at each of the corners inside of the PAX drawer box.
Finally, 1″ cabinet screws were installed to firmly attach the drawer front.


Don’t make this mistake: The drawers will end up sagging a little without the spacers, so make sure to keep the spacers in until all drawer fronts are attached.
We didn’t do this on the first set of drawers and ended up with larger gaps around the top drawer face.

Adjusting the Top Ikea PAX Drawer
As with any DIY project, there are unexpected things that happen.
This might happen to you: As we mounted the drawer faces from the bottom to the top, we realized that the top drawer wouldn’t be able to open due to the drawer hardware being slightly lower than the PAX drawer!

To fix this, we had to adjust the very top Ikea PAX drawer position slightly higher than where the pre-drilled PAX holes already are.
Solution: We drilled new holes in between the existing PAX holes (right in the middle) and re-installed the drawer hardware. This now allowed the drawer to open correctly.

Drawer Knobs

The Exact Drawer Knobs We Bought
We decided to splurge on these Rejuvenation drawer knobs for a high-quality and luxurious feel and they were 100% worth it!

The knobs come with 3 screw sizes included with your purchase – we used the longest size for the drawers and the shortest size for our PAX door.
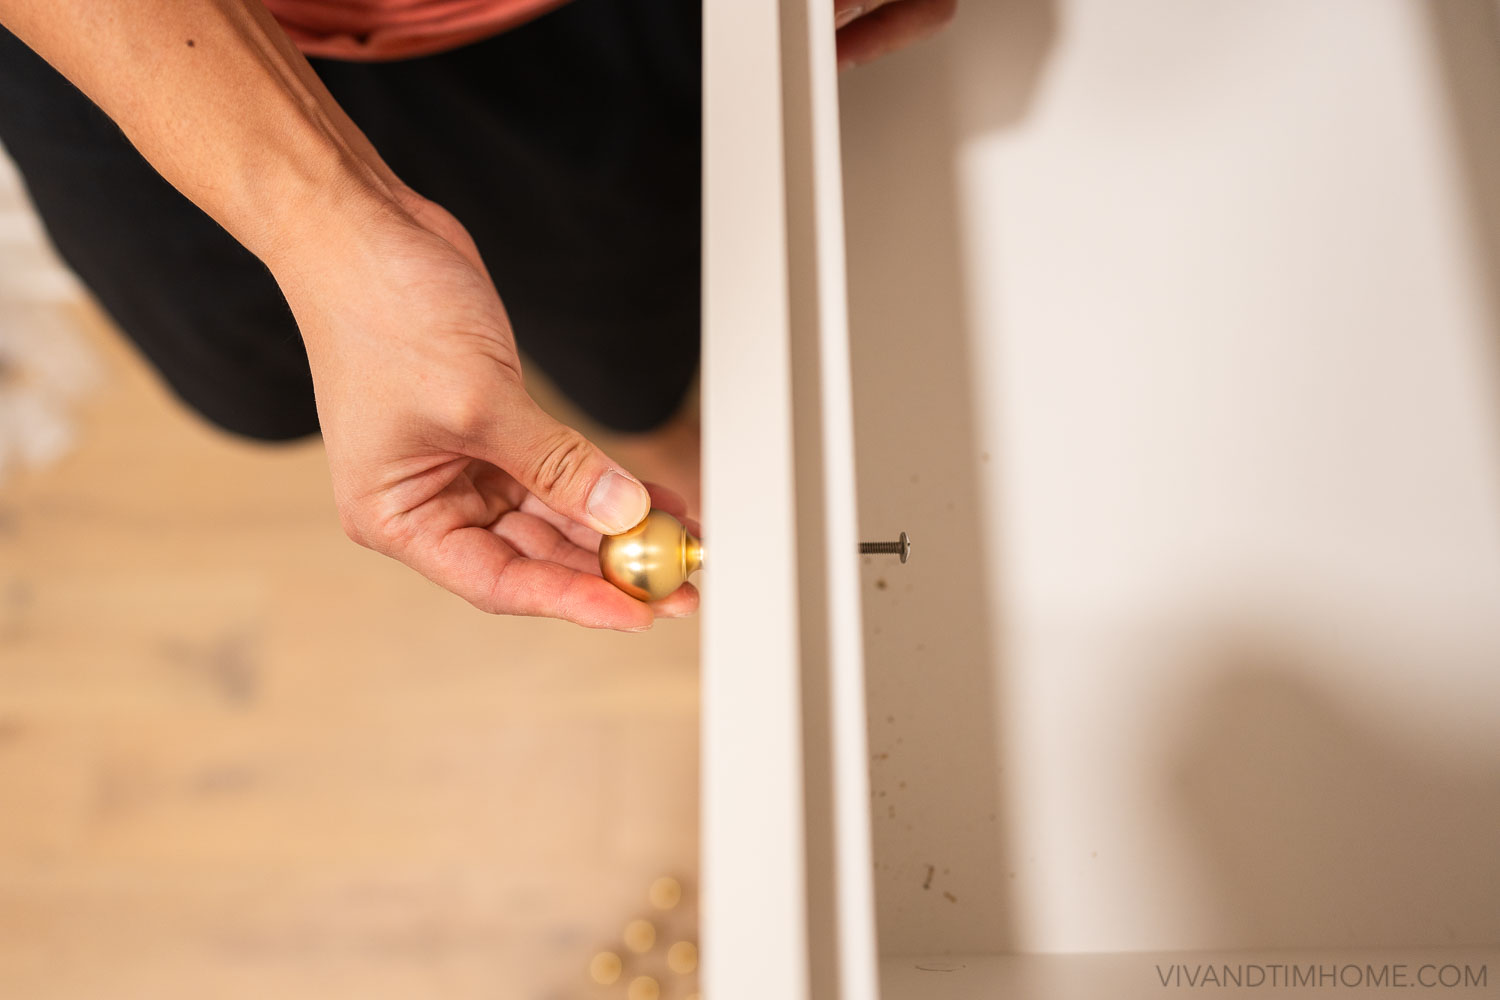
These Rejuvenation knobs are super heavy and look expensive (because they were)!
They complete our closet perfectly and add the perfect finishing touch.
We chose the Aged Brass finish which complemented our SW Aesthetic White color beautifully.

This is a more affordable Amazon drawer knob alternative that is a little more budget-friendly and has a similar look.
For us, we felt like investing in a better-quality knob would really complete our closet look and we get compliments on these drawer knobs all the time!

Conclusion: DIY Drawer Fronts
We hope you found this post helpful on how to make DIY drawer fronts for an Ikea PAX walk-in closet!
Check out our full detailed blog post with a step-by-step tutorial on how to DIY a Custom Ikea Built-in Closet!
The complete guide includes our total project cost, the exact PAX products we bought, how to trim out the PAX for a custom built-in look, how to paint the PAX wardrobe, and more!
SAVE AND PIN FOR LATER:

For more modern home ideas, follow on Instagram @vivandtim.home.


I love the finished design. I do have a question though – all these pax drawer hacks add a layer of drawerfront on top of the original drawer front. Does this make the system heavier? What does it look like when you open the drawers? (Wondering if redoing the front by drilling new holes in a single new drawer front or adding a drawer front to the original one)
It does make it heavier but no issues with this!