Looking for Ikea closet ideas? This guide is full of helpful Ikea PAX wardrobe ideas to help create your dream walk-in closet!
We love how our small walk-in closet turned out using the affordable Ikea PAX system. We’re so glad we got rid of our wire shelving and created a custom closet on a budget. Now we have a well-designed closet organization system that keeps our closet tidy!
In this post, we’re sharing everything we learned building the Ikea PAX closet system, including helpful tips for assembly, how to hack the PAX for a custom size, and must-have accessories to buy.
Also, check out our blog post about how we came up with our closet design including total cost and tips for designing a narrow closet.
This post may contain affiliate links, which means we’ll receive a commission if you purchase through our link, at no extra cost to you. You can read our full disclosure here.

For reference, we ordered the 13” depth option since our walk-in closet is pretty narrow and the 93” height to maximize vertical space.
The Before


Our closet had the basic builder-grade wire shelves that were not functional at all and had tons of wasted space. The first thing we did was take these down and patch all the holes.
For more ideas, check out our post on easy DIY Closet Shelves to complete in one weekend!

Helpful Tips for Assembly
1) Assemble All the Drawers First
We had quite a few drawers to make and had to wait for drywall patches to dry. It was very satisfying to install the all of drawers right after the frames were installed.
2) Use a Ratcheting Screwdriver
Using a ratcheting screwdriver is a LIFESAVER. We found these highly rated ones on Amazon and it’s been a game changer! These save time and effort for any furniture assembly project and trust me, you’ll never go back to a regular screwdriver.
Having one Philips and one flathead would be even better, then you don’t have to switch between the heads since you need both per drawer.
3) Get Your Own Anchor Screws
The wall anchors that come with the PAX units do not come with screws, so you’ll need to get your own based on what material your wall is.
We had many drywall anchors left over from our other mounting projects, so we already had them on hand.
4) Use Painter’s Tape to Mark Holes
Use painter’s tape to mark out which holes the drawers, accessories, and shelves will be going in.
The Ikea online PAX planner includes a summary of the hole numbers based on your design. I printed it out for reference during the build.

5) Use a Bar Clamp to Secure Ikea PAX Frames Together
Ikea recommends using a bar clamp to hold the frames together while you drill and screw them together.
We appreciated that Ikea included screws to line up adjacent frames so that there was no gap between each frame.

Helpful Tools For Assembly

2024 UPDATE: Read our post on the latest changes to the Ikea PAX 2.0 Closet design!
Ikea PAX Wardrobe Hack: How to Create a Custom Size
Can you cut the Ikea PAX frame to fit a narrower space? The answer is yes!
In our closet, we have a little nook in the corner that was half an inch less than the 29″ frame. We were unsure if we could cut the frame to fit in the space, but it turned out great!

Measure how much to cut off of the top and bottom pieces. We left around .5″ – 1″ of extra space to the left and right to make sure the fit was not too tight.
Use painter’s tape on the area that will be cut to prevent any splitting. We used a circular saw to make the cuts and ended up with clean edges.
Five screws seemed to be enough to hold the top and bottom boards to the side pieces. The frame still felt very sturdy compared to the other frames using the included hardware.
Cutting the backboard ended up taking a lot of time. We ended up using a box cutter, but a table saw would have made this much easier.
Tools Needed for Cutting the Ikea PAX:
- Tape Measure
- Drill & Driver to drill pilot holes and drive in screws for the custom-cut side
- Speed Square for marking out perpendicular cuts
- We don’t have a table saw (too big and too expensive), so we use a Circular Saw and a Track to cut wood, and we’ve had good results using this method.


Tools for Custom Fitting
How to Cover the Ikea PAX Wardrobe Holes
The product to cover the unused Ikea PAX holes is called VARIERA COVER PLATE and is found in the kitchen department near kitchen accessories. It’s only $1.29 per pack of 100 covers!

I bought extra bags just in case. You honestly don’t need to cover every single hole, but we ended up doing just that because it wasn’t that much more work. Just make sure your shelves and everything are in their final position.
It saves so much time to line it up along the hole and use something that has a soft backing to punch in the cover (we used the back of pliers). This way, it detaches from the chain while getting pushed into the hole at the same time.
At first, we broke off the cover and then pushed it into the hole with our thumbs, which we don’t recommend because your thumbs will get sore very quickly!


BEFORE COVERING HOLES:

AFTER COVERING HOLES:
Ikea Closet Rod Alternative for an Upgraded Look
You don’t have to use the Ikea rods!
We bought these chrome oval rods from Amazon and cut them to size.
At the time, they were selling a set of three 48″ rods for $29, so for around $10 each it was equivalent to the price of IKEA white rods also priced at $10 each.
For a little extra work, you can achieve a much higher-end look.
We placed the closet rod a little farther back than where the pax holes are so that our clothes wouldn’t protrude out too far. You can measure where your hangers would go and decide how far back you want it.
You’ll have to drill new holes for the rod if you do it this way, but it’s worth it to gain some extra space, especially if you have a tight closet like us. For us, our rod is placed 3 inches from the front of the unit.

Cutting the Rods to Size
The rods were cut easily using an angle grinder. If you don’t have one already, a hack saw worked fine too!
- For the 39″ width frame, we measured and cut the rod to 37 5/8″
- For the 29″ width frame, we measured and cut the rod to 27 11/16″
These are listed for reference, but be sure to measure it out yourself too!
The rods don’t come with screws either. We used 3/4″ long tapered screws to make sure the screws wouldn’t come out the other end of the frame.

How Our Upgraded Amazon Rod Turned Out

At first, I was worried about how much the clothes would stick out of the 13-inch depth Ikea PAX wardrobe with the installation of an alternative closet rod.
For women’s sweaters, it doesn’t stick out too much at all and I was very happy with how it turned out!

However, men’s hoodies do stick out much more and we kept those to the ends of our wardrobe so that it wouldn’t feel too cramped in our narrow walk-in closet.


Chrome Rods From Amazon
4 Must-Have Ikea PAX Accessories to Buy:
1) Komplement Pull Out Pants Hanger

This pants hanger accessory is a must-have for any Ikea PAX closet to easily organize all your pants in one spot.
Ikea replaced this pants hanger with a new model. The old style had reviews that said the pants fall off easily. The new model fixes this issue with a frame in the front to prevent pants from sliding off.
We never slammed ours closed, so we never had an issue with this. But nice to see Ikea improving on the design!

2) Komplement Pull Out Trays
Incorporating Komplement pull-out trays into your Ikea PAX closet design is great for storing jewelry, wallets, and other smaller or flat items. I also used pullout trays for multiple levels of shoe storage as well.

3) Ikea PAX Drawers – use A LOT of them!
To achieve a clean look, utilize as many Ikea PAX drawers as possible! The more drawers you can use the better.
In our closet, we tend to fold more clothing than hang so drawers were easily a must-have in our walk-in closet design.
We have 17 total drawers in our closet, with the top row being glass drawers.
I’m including the height measurements here because this would have been helpful for me to know while deciding how many drawers to choose before ordering!
This measurement includes the shelf that would go above the drawers:
- Height of 4 stacked drawers – 35 1/2”
- Height of 5 stacked drawers – 43”

4) Drawer Organizers
Ikea discontinued the organizers we bought, but they now have a similar model that comes in a set of 3 different sizes and comes in a darker gray color.
There will be a little gap at the back of the drawer, which can be viewed as wasted space but I was okay with it since I did like the overall look and functionality.

If you’re not using enough organizers to fit the whole span of the drawer, the organizers will tend to get a little loose.
These felt organizers come flat and you fold it to set it up, so I found that by pressing down hard on each fold FIRST before building it helped to maintain its shape without getting loose.

So, How Long Did Our Ikea PAX Closet Take to Assemble?
The first frame took a lot longer to complete, but it became faster the more familiar we got with the process, and by the 5th frame we built it in 30 minutes!
All 17 drawers took 1.5 hours to assemble. These also got quicker the more we built them.
You can set aside a whole weekend to get it done, including all the prep if you have to remove existing shelves/rods and patch holes.
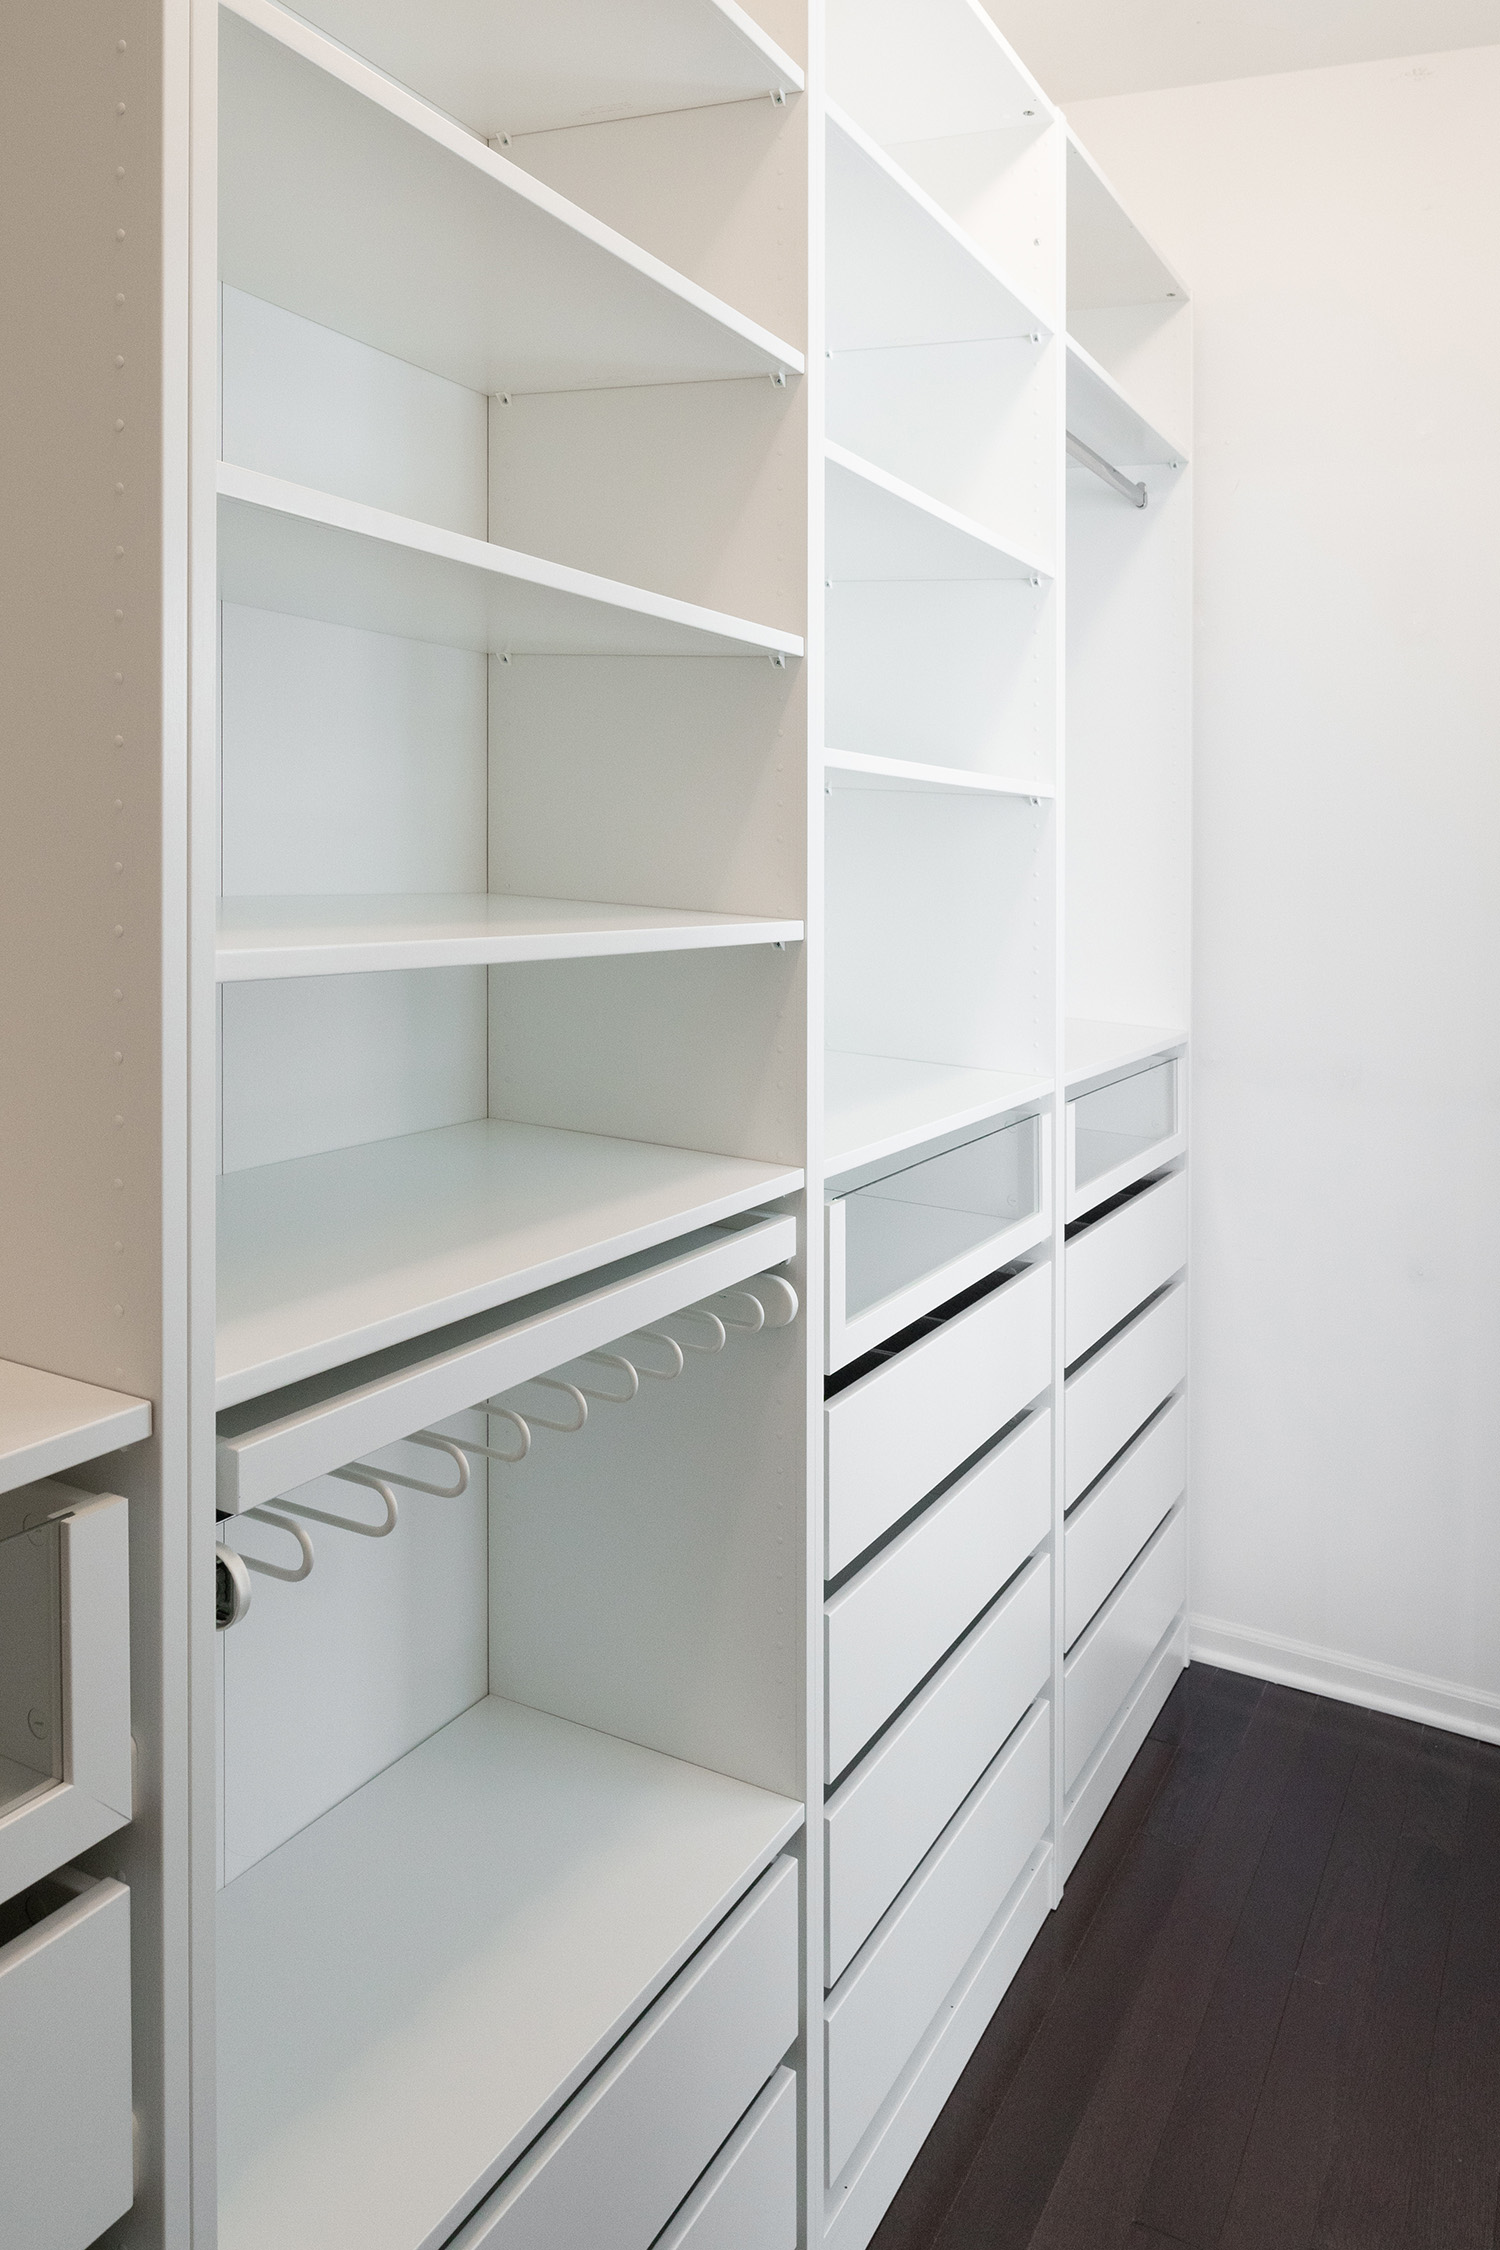
Here’s how our walk-in closet looked after assembling the five PAX wardrobe units:


Our Finished Ikea Closet Design:
We LOVE how our Ikea closet turned out! With such a narrow space, we were able to maximize the vertical space, and now our closet functions so well for us.


We were nervous to cut the Ikea PAX wardrobe unit down to a custom size but it worked out great and we’d be confident to cut and customize the size for future PAX closets again.

The shelves on the 13-inch depth Ikea PAX units provide plenty of space for folded sweaters and crewnecks.


OVERALL IMPRESSIONS
It is a lot of work to set up and assemble, but these kinds of projects are a good bonding activity haha. We had fun figuring out how to work efficiently as a team!
Some of the pull-out trays and drawers tended to stick a little when pulling out and had a lot of resistance at first, but the more you use it the smoother it gets. Within a week, they all felt very smooth.
Our favorite part about the PAX are the soft-close drawers! They all come with this feature at no extra charge.


We ended up really liking the Ikea PAX system! It’s a great value for the amount of customizable parts that you can get and is very cost-effective for achieving a “built-in” looking wardrobe.
We would definitely use the Ikea PAX for future closets and highly recommend this closet system as an affordable closet solution.
2024 UPDATE: Read our post on the latest changes to the Ikea PAX 2.0 Closet design!
Helpful Tools for Pax Assembly
We have a separate post on how we came up with our walk-in closet design that includes how much we spent on this project!
For more ideas, check out our post on How to DIY a Custom Walk-in Closet with the Ikea PAX Wardrobe for a built-in look!
Follow on IG @vivandtim.home for more home inspiration.
PIN & SAVE FOR LATER:


HI GUYS, NICE JOB! I have a question regarding cutting the material. I was wondering how much you cut off. because Ikea material is much little and I’m under the impression that Ikea panels are manufactured the same way a hollow door is assembled where the border is solid about 2″ all the way around and the middle of the board is a thin layer 1/8″ thick on both sides with a compressed cardboard inside. therefore if you have the need to cut more then 1″ to 2″ off it may not be possible.
On the frame you cut, how did you cut the shelves so they would fit since the width changed?
Do you have any pictures with clothes in the closet? I like your idea of using the narrow frames and change the rods, but would like to see how it looks with the clothes.
I am wondering what is the divider frame you used inside the 29″ frame (that you cut down to fit on back wall). I am looking for a divider frame like that on IKEA website but its only for the 22 in depth, not the 13″ depth. Did you make it yourself?
Hi there! We didn’t make it – it is the 13″ depth divider. I’m not sure if they still offer that for 13″ I also couldn’t find it searching on the website just now!
Very well done 😍 What was the measurements of the space?
Thanks so much! The closet space was 130 in. long and 45 in. deep
So I am planning my closet and I am finding that to max out my space it is about 2 inches too long in terms of the length. So I don’t have to cut the side boards for height. So is it possible to cut the top and bottom pieces, the shelves and the back portion without totally ruining it?
Do you think I could cut the drawers down too? They seem to all be modular and it should work.
It may be possible but all the cuts would have to be super precise for it to work! We were too lazy to try that so we just stuck to cutting the frame only haha.
Hi Viv & Tim, that looks so good!
Thank you for sharing, this will be very helpful 🙂
Can you roughly estimate how long did it take you to assemble begging to end? (I’m looking for a similar work in the near future)
Thanks again!
You’re very welcome! I’m glad this is helpful for you! It took us basically the whole weekend to do this project 🙂
vorrei sapere le misure di questo modello sarebbe ideale per le mie esigenze.
Do you know if the frame is solid or hollow?
For the closet rods, I would like to put it 5″ from the outside edge vs your 3″
how has your rod held up so far?
Thanks
Hi! The frame is not hollow and feels very sturdy. The rods have held up great! No issues after a couple of years so far 🙂